
How to set up sso and scim
Your enterprise customer just asked whether your project tool supports SSO, SAML, and SCIM before they sign, and "maybe" is not going to cut it. Their security team wants employees signing in through the company identity provider. They want people who leave the company to lose access without anyone filing a ticket. And they want proof that both of those are actually wired up, not promised. This is exactly the moment where a lot of project tools go quiet, flash a "contact sales" button, and the deal drifts for two weeks.
Utter does not stall here. Project management SSO, SAML, and SCIM setup all live in one settings tab, and a workspace owner or admin can wire the whole thing up in about the time it takes to copy a handful of values out of Okta or Azure AD. This guide walks you through all three, tells you which URL goes where, and stays honest about the edges: what Utter does, what it deliberately does not, and what you should not promise your security team without checking first.
Get the mental model right before you touch anything. It saves you an hour of confusion later.
What SSO, SAML, and SCIM actually do for your workspace
These three acronyms travel together on every procurement checklist, but they answer two separate questions.
| Question it answers | Protocols in Utter | |
|---|---|---|
| SSO | Who is this person, and can they sign in? | OIDC and SAML 2.0 |
| SCIM | Which people should exist here, and how does the list stay matched to the directory? | SCIM 2.0 (Users only) |
SSO (single sign-on) is about authentication. Utter speaks two flavors. OIDC (OpenID Connect) is the modern JSON-over-HTTPS protocol most new identity providers default to. SAML 2.0 is the older XML standard that large enterprises have run on their Okta, Azure AD, and OneLogin tenants for years. Both do the same job. When someone tries to sign in, Utter hands them to your identity provider, your provider checks their credentials, and it sends back a signed answer: yes, this is [email protected], she's legitimate, let her in.
SCIM (System for Cross-domain Identity Management) is about provisioning. When HR adds someone to the Engineering group in your directory, SCIM can create their Utter account. When that person leaves and gets deactivated in the directory, SCIM removes them from the workspace. It covers the "stay in sync" half that plain sign-on can't.
An enterprise buyer wants all three because each closes a different hole. SSO means one login and no separate password sitting around to leak. SCIM means offboarding happens automatically instead of living on a checklist someone forgets on a Friday. Put together, they're the line between "we trust your app with employee access" and "we don't."
In Utter, all three sit in one place: Settings > SSO, visible only to workspace owners and admins. And here is the first thing to name out loud, because it shapes every later decision: magic-link sign-in keeps working the entire time. Turning on SSO does not turn off the passwordless email link. That is a real limit with real consequences, and I will come back to it at the end. For now, hold the thought.
Before you start: who can set this up, and what you need from your IdP
Two prerequisites. Nail them before you open the tab.
First, permissions. The SSO tab is owner and admin only. It's gated by the workspace.edit_settings permission, which means members and viewers never see it. The tab is hidden from their settings nav, and if they paste the URL directly they get redirected away. So if you're configuring this for a customer, confirm the person doing it is an owner or admin of that specific workspace. Not a project admin. A workspace one.
Second, the values from your identity provider. What you need depends on which protocol you're setting up, and you can do one or both.
For OIDC, three things from your IdP, gathered by registering Utter as an application in the provider's admin console:
- an Issuer URL (your provider's base URL, like
https://your-org.okta.com) - a Client ID
- a Client secret
For SAML, three different things:
- your IdP's entity ID
- its sign-in URL (where Utter should send people to authenticate)
- its signing certificate in PEM format (the public cert your provider uses to sign assertions, so Utter can prove they're genuine)
One environment detail that trips people in testing: production requires HTTPS for issuer and SSO URLs. Plain http:// is accepted only for localhost in development. Paste an http:// production URL and it won't be accepted.
Choose OIDC or SAML based on what your provider does best. Most modern setups reach for OIDC because it's fewer fields to configure. Plenty of large enterprises standardize on SAML because that's what the rest of their stack already speaks. You can enable both, but know that the auto-detect entry point prefers OIDC when both are on. There is no per-user "let me pick SAML today" chooser.
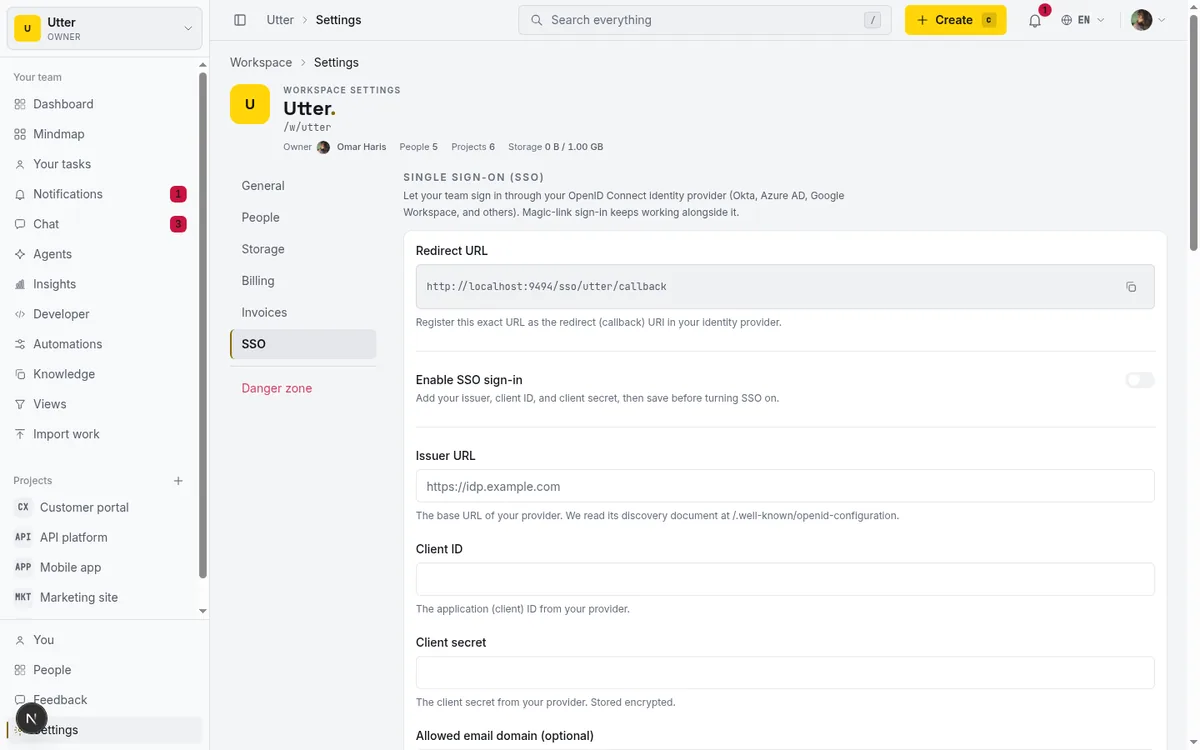
That single panel is where all of this happens. Three stacked sections, one save flow each. Now let's fill them in.
Set up OIDC single sign-on (the shorter path)
If your provider speaks OIDC, start here. Fewer fields, and the one I'd reach for first.
Open Settings > SSO and find the Single sign-on (SSO) section. First thing to notice: Utter has already computed two URLs for you at the top, where {slug} is your workspace's URL slug. These are values your identity provider needs to know about Utter, not the other way around.
| Value in Utter | Path | Where it goes |
|---|---|---|
| Redirect URL | /sso/{slug}/callback |
The redirect or callback URI field in your IdP app |
| Sign-in URL | /sso/{slug}/login |
Anywhere you want a direct SSO entry link |
So the order matters. Copy those URLs into your IdP application first. When you create the app integration for Utter in Okta or Azure AD, it asks for a redirect or callback URI. Paste the Redirect URL there. That's the address your provider sends the user back to after they authenticate. Register it before you finish the Utter side, or your first test sign-in bounces with a redirect mismatch, which is the single most common OIDC setup failure and a genuinely annoying one to debug blind.
Once Utter is registered in your IdP, come back and fill in the fields going the other direction. Paste the Issuer URL, the Client ID, and the Client secret. The secret is stored encrypted, and after you save, the label reads "A secret is configured" instead of echoing the value back. That's expected. If you ever need to change it, you re-enter it; Utter will not show you the stored one.
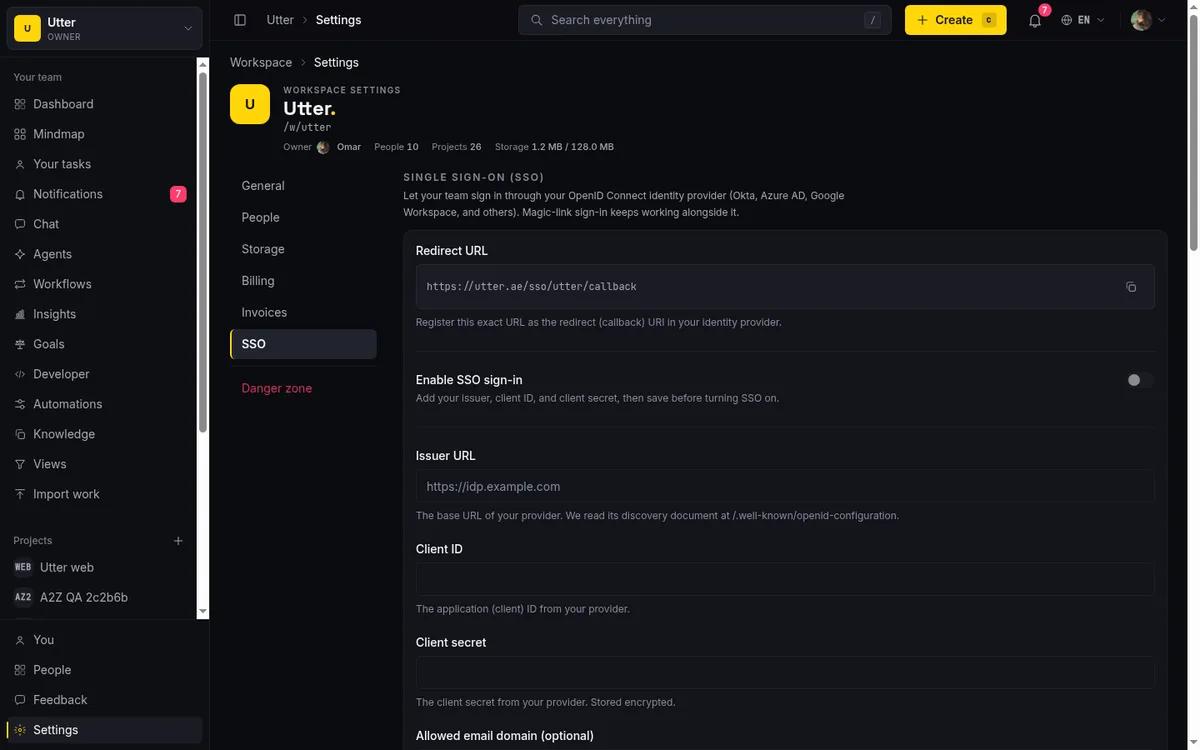
There's an optional field here too: Allowed email domain (optional). Leave it blank for now if you want any verified email through. I'll cover why you'd set it in a later section.
Hit Save configuration first. Then flip Enable SSO sign-in. This two-step order (save, then enable) is deliberate. It lets you stage the config and turn it live as a separate, conscious action, so you're never half-configured and accidentally accepting real logins.
One thing about how the OIDC callback behaves, because it will bite you if your directory is messy: the callback hard-requires email_verified === true. If your identity provider returns a user whose email isn't marked verified, Utter rejects the sign-in. That's a security decision, not a bug. It stops someone from walking into a workspace on an unverified or spoofable address. When a real person gets blocked, the fix is in your directory (mark their email verified there), not in Utter.
What good looks like: the Enable toggle is on, and the first time a real employee runs a test sign-in, Utter just-in-time creates them as a member of this one workspace and drops them on the board. No invite email, no manual add. They authenticate against your IdP, and they're in.
Set up SAML 2.0 for Okta, Azure AD, or OneLogin
Same tab, next section down: SAML single sign-on. This is the path for the classic SAML 2.0 setup that Okta, Azure AD, and OneLogin have supported for years.
The pattern matches OIDC: copy Utter's computed values into your IdP, then paste your IdP's values back. Only the specific values are SAML-flavored. At the top of the section Utter gives you three of them:
| Value in Utter | Path | What it is |
|---|---|---|
| ACS (reply) URL | /sso/{slug}/saml/acs |
Where your IdP POSTs the signed assertion after authentication |
| SP entity ID (audience) | /sso/{slug}/saml/metadata |
Utter's identifier as a Service Provider, the audience the assertion is meant for |
| SAML Sign-in URL | /sso/{slug}/saml/login |
The direct SAML entry point |
Both the ACS URL and the SP entity ID go into the Utter application you create in your IdP.
Here's a nicety that saves a lot of manual typing: Utter serves SP metadata XML at /sso/{slug}/saml/metadata. Most identity providers let you register a Service Provider by pasting a metadata URL instead of entering every field by hand. Point Okta or Azure AD or OneLogin at that metadata endpoint and it reads the correct values for you. The metadata declares WantAssertionsSigned=true (Utter insists on signed assertions), an HTTP-POST binding for the ACS, and an emailAddress NameID format. That last one matters for the next paragraph.
Now paste your provider's values into Utter: the IdP entity ID, the IdP sign-in URL, and the IdP signing certificate as PEM text. After saving, the certificate field reads "A certificate is configured" rather than showing the cert back, same pattern as the OIDC secret. The same optional Allowed email domain field lives here too.
Save, then flip Enable SAML sign-in.
The one hard requirement: the SAML assertion has to carry an email address. Either as the NameID (which is why the emailAddress NameID format matters) or as an email attribute in the assertion. If your provider sends back a username or an opaque ID with no email attached, Utter has nothing to key the user on, and the sign-in fails. In Okta and Azure AD this is just mapping the user's email into the SAML attribute statement, which their setup wizards make painless. Verify it before you tell anyone it works.
Set up SCIM provisioning so your directory stays in sync
Authentication is handled. Now the "keep the roster matched" half: SCIM provisioning, the third section in the same tab.
Start with the token. Click Generate token and Utter mints a Bearer token. Read this sentence twice: the token is shown exactly once. Utter stores only a SHA-256 hash of it, never the token itself, so there is no "show it again" button anywhere in the product. While it's on screen, use Copy token and paste it straight into your identity provider's SCIM connector configuration. Close the dialog without copying it and it's gone; your only path forward is Rotate token to mint a fresh one (which invalidates the old one).
Next, copy the SCIM base URL (/scim/v2). This is the endpoint your provider's SCIM connector talks to. In Okta or Azure AD's provisioning setup, you paste this base URL and the Bearer token together; that pair is how your directory authenticates to Utter. Every SCIM operation is scoped to the workspace the token belongs to, so a token for your workspace can never reach into anyone else's.
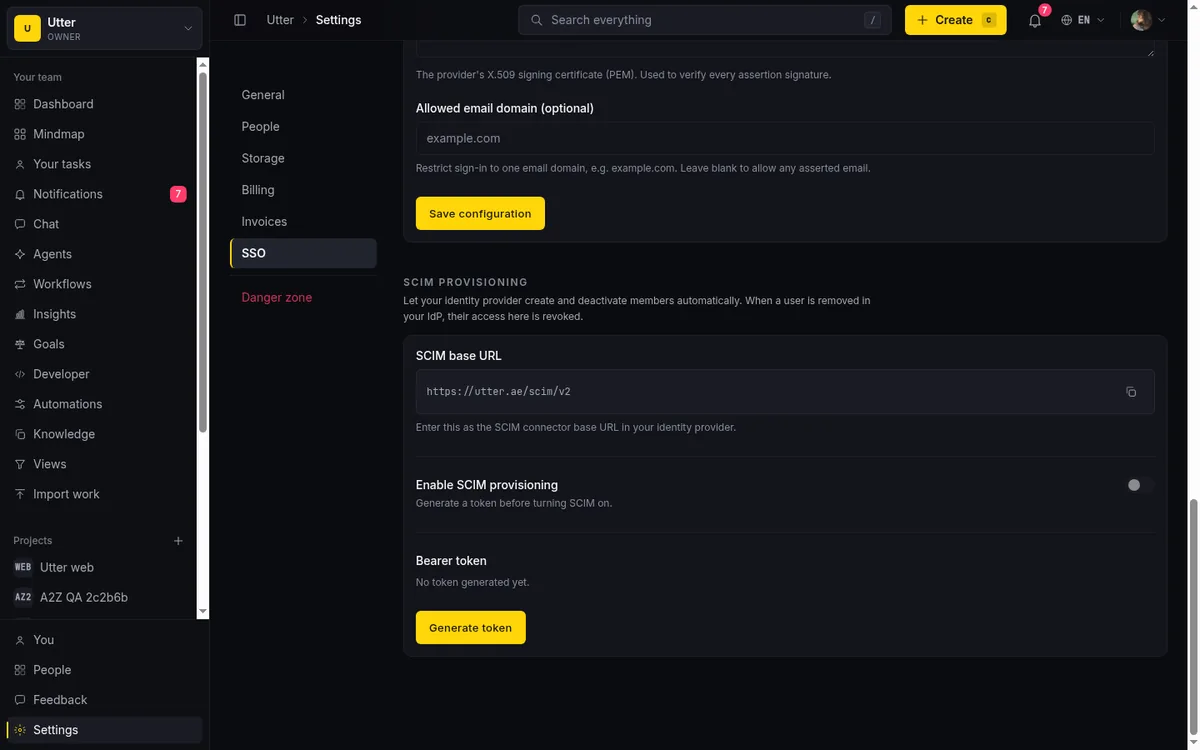
Then flip Enable SCIM provisioning. Before a token exists, the section reads "No token generated yet." Once you've generated and enabled, it reads "A token is configured." That flip is your confirmation the connection is armed.
Your IdP's connector does all the SCIM traffic for you, but you can verify the wiring yourself with one request. Look up a member by email, exactly the way the connector does before deciding whether to create or update someone:
curl -G "https://utter.ae/scim/v2/Users" \
  -H "Authorization: Bearer utscim_your_token_here" \
  --data-urlencode 'filter=userName eq "[email protected]"'
const params = new URLSearchParams({ filter: 'userName eq "[email protected]"' });
const res = await fetch(`https://utter.ae/scim/v2/Users?${params}`, {
headers: { Authorization: "Bearer utscim_your_token_here" },
});
console.log(await res.json());import requests
r = requests.get(
"https://utter.ae/scim/v2/Users",
headers={"Authorization": "Bearer utscim_your_token_here"},
params={"filter": 'userName eq "[email protected]"'},
)
print(r.json())A healthy response comes back as application/scim+json with the standard ListResponse envelope:
{
  "schemas": ["urn:ietf:params:scim:api:messages:2.0:ListResponse"],
  "totalResults": 1,
  "startIndex": 1,
  "itemsPerPage": 1,
  "Resources": [
    {
      "schemas": ["urn:ietf:params:scim:schemas:core:2.0:User"],
      "id": "<user-id>",
      "userName": "[email protected]",
      "displayName": "Jane Doe",
      "emails": [{ "value": "[email protected]", "primary": true, "type": "work" }],
      "active": true
    }
  ]
}
Under the hood, Utter exposes the standard SCIM discovery endpoints (ServiceProviderConfig, ResourceTypes, Schemas) so Okta, Azure AD, and OneLogin can probe what Utter supports before they push any data. Their connectors hit these automatically. GET /scim/v2/ServiceProviderConfig answers with capability flags like these (trimmed):
{
  "patch": { "supported": true },
  "bulk": { "supported": false },
  "filter": { "supported": true, "maxResults": 200 },
  "changePassword": { "supported": false },
  "sort": { "supported": false },
  "etag": { "supported": false }
}
It's how the provider learns that Utter supports PATCH and equality filtering on userName, and does not support bulk operations, sorting, etags, or password change. You never touch these endpoints yourself; they're there so the handshake works.
How users actually sign in, and how provisioning creates them
You've done the workspace side. Here's the experience from the other end, for the people actually signing in.
An employee goes to /login. Magic link is still the primary, most visible option (that coexistence again). Below it sits a Sign in with SSO link. They click it, a Workspace URL field appears asking for the workspace slug (the short name in your workspace's URL), they type it, and click Continue.
That routes them to /sso/{slug}, where Utter auto-detects which protocol is enabled for that workspace. OIDC on? It uses OIDC. Only SAML on? It uses SAML. Both on? It prefers OIDC. The user never chooses; they get forwarded to the right flow, authenticate with your provider, and come back signed in. There's a Back link for when they fat-finger the slug.
sequenceDiagram
    participant E as Employee
    participant U as Utter
    participant I as Identity provider
    E->>U: Sign in with SSO plus workspace slug
    U->>U: Auto detect protocol, OIDC preferred
    U->>I: Redirect to sign in
    I->>I: Check credentials
    I->>U: Signed response to callback or ACS
    U->>U: Verify email, JIT provision if new
    U->>E: Signed in as a member
The provisioning behavior is the part worth internalizing. A first-time SSO user, someone who has never had an Utter account, is just-in-time provisioned: Utter creates the user and adds them to that one workspace as a member. No pre-existing invite. They authenticate, they exist, they're in, as a member.
SCIM covers the fuller lifecycle from your directory's side:
- Create (a SCIM
POSTfrom your IdP) just-in-time provisions the membership, same as a JIT sign-in. - Deprovision happens three ways: setting
active=false, aPATCHthat deactivates, or aDELETE. Any of them removes the person's workspace membership. - Read is a SCIM
GETto list members or fetch one. - Filter is an equality match on
userName, which is how your provider looks a user up before deciding to create or update them.
flowchart LR
    A[Directory change] --> B{What happened}
    B -->|User added| C[SCIM POST creates the membership]
    B -->|User deactivated| D[PATCH sets active false]
    B -->|User removed| E[DELETE drops the membership]
    C --> F[Workspace roster matches the directory]
    D --> F
    E --> F
The deactivation your IdP sends when someone leaves looks like this on the wire:
curl -X PATCH "https://utter.ae/scim/v2/Users/<user-id>" \
  -H "Authorization: Bearer utscim_your_token_here" \
  -H "Content-Type: application/scim+json" \
  -d '{
    "schemas": ["urn:ietf:params:scim:api:messages:2.0:PatchOp"],
    "Operations": [{ "op": "replace", "path": "active", "value": false }]
  }'
That one call removes the person's membership in the workspace the token belongs to, and only there.
For anyone not going through SSO, the ordinary invite flow works exactly as before. See how to invite team members for the link-based path. SCIM and invites coexist happily in the same workspace.
Restrict sign-in to your company domain and keep an audit trail
Two things turn a working setup into a defensible one.
First, the Allowed email domain (optional) field, which shows up on both the OIDC and SAML sections. Set it to your company domain, say example.com, and Utter accepts SSO sign-ins only for emails at that domain. Leave it blank and any verified or asserted email is accepted.
Why bother? Because a loosely configured identity provider, or one that can assert external-guest emails, could let people into the workspace you never meant to admit. Pinning the domain is a cheap, legible guardrail: only @example.com humans get in through SSO. For a workspace tied to one company, set it. There's little reason not to.
Second, the audit trail, which is what you hand the security reviewer when they ask "who changed our enterprise auth, and when." Every configuration change writes to the workspace audit log:
sso_configured,sso_enabled,sso_disabled,sso_deleted, plus the parallelsaml_*eventsscim_token_rotated,scim_enabled,scim_disabled- the human events that matter:
member.joined_via_ssowhen someone JIT-provisions in, andmember.removed_via_scimwhen your directory deprovisions someone
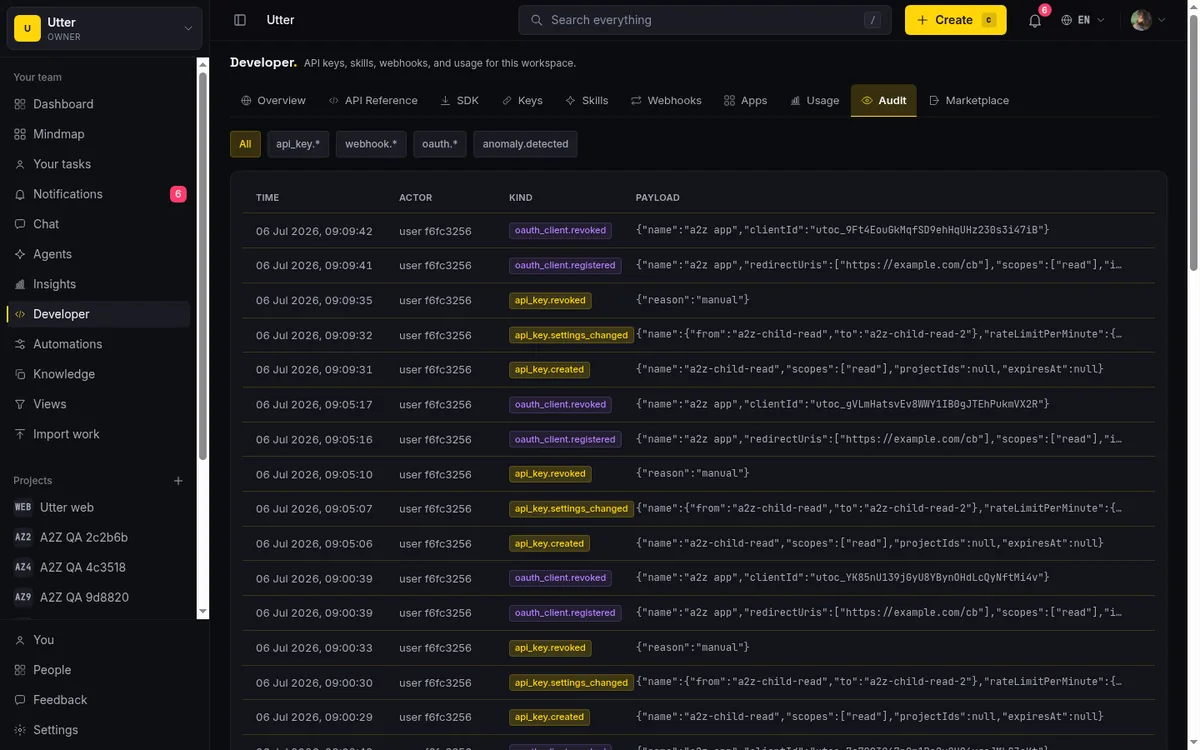
So the whole arc is on record: the admin who turned SAML on, the token rotation last quarter, the contractor auto-removed when HR deactivated them. If you're building the case that Utter is safe to hand employee access to, this log is your evidence. For how to read and use it, see keeping an audit trail of changes.
The limits worth knowing before you promise this to security
Better you hear these from me now than from an annoyed security reviewer after the contract's signed. None of it is invented. It's how the feature ships today.
Magic link never turns off. This is the big one. There is no "require SSO" switch and no "disable magic link" toggle. SSO, SAML, and SCIM all run alongside passwordless email sign-in, not instead of it. You cannot enforce SSO as the only login method. If your security team's requirement is literally "employees must authenticate through Okta and nothing else," Utter does not meet it today. Anyone who can receive email at an address on the workspace can still request a magic link. Put this on the table during the deal; do not let it surface after signing.
There is no role mapping. Every JIT-provisioned SSO user joins as a member. Utter does not read IdP groups and map them to roles, does not sync groups at all, and SCIM handles the User resource only. There is no SCIM Groups resource. So "put people in the Engineering AD group and they become project admins in Utter" is not a thing that happens. After someone is provisioned, an owner or admin changes their role by hand inside Utter if they need more than member.
Deleting a config turns the feature off but doesn't lock anyone out. Use Delete configuration (there's a confirm dialog, so you won't nuke it by accident) and SSO stops working, but existing members keep their magic-link access. Deleting SSO is not an offboarding tool.
SCIM is deliberately minimal. No bulk operations, no sorting, no etags, no password change. Filtering is equality on userName only. And the last owner of a workspace cannot be deprovisioned; SCIM refuses it, so you can't orphan a workspace by deactivating its only owner in your directory. Sane constraints, but if your IdP connector expects bulk or sort, know that Utter declines those and the connector should fall back to per-user operations.
On plans and pricing, phrase it carefully. As shipped, configuring SSO, SAML, and SCIM is gated by workspace role, owner or admin, not by a checked paid plan. Any workspace owner or admin can turn it on. There is a reserved sso feature flag in the plan config, and some product material has described SSO as a business-tier feature, but no plan check actually runs in the SSO, SAML, or SCIM code paths right now. So when a customer asks "do I need to upgrade to configure SSO," the honest answer as-shipped is no, the gate is your role, not your plan. That could change, so if plan-gating matters to a deal, confirm it against your current billing rather than quoting this article. (On the related question of whether SSO users burn paid seats, see do AI agents count as seats for how Utter thinks about who counts.)
That's the full picture, warts included. For teams that want one login through their existing identity provider, automatic offboarding when someone leaves the directory, and a clean record of who changed what, Utter's enterprise sign-on does the job in a single settings tab, with no sales call and no bespoke integration project. Walk in clear-eyed about the magic-link coexistence and the member-only provisioning, and you'll set your customer's expectations right the first time.
If you're weighing Utter against a heavier tool for exactly this kind of enterprise requirement, the Utter vs Jira comparison lays out where each one lands.
Ready to wire it up? Open your workspace's Settings > SSO tab and copy that first Redirect URL into your identity provider.
Frequently asked questions
How do I set up SSO, SAML, and SCIM for my project management workspace in Utter?
Go to Settings > SSO as a workspace owner or admin. That one tab has three sections. For OIDC, copy Utter's Redirect and Sign-in URLs into your identity provider, then paste back the Issuer URL, Client ID, and Client secret, save, and enable. For SAML, copy the ACS URL and SP entity ID into your provider, paste back the IdP entity ID, sign-in URL, and signing certificate, save, and enable. For SCIM, generate a Bearer token, copy the SCIM base URL, and enable provisioning. All three are independent and can run at once.
Do I need a specific paid plan to turn on SSO or SAML in Utter?
As the feature ships today, no. Access is gated by your workspace role (owner or admin), not by a checked paid plan, so any owner or admin can configure it. A reserved plan flag exists and this could change, so if plan-gating matters to your contract, confirm it against your current billing rather than assuming.
Can I make SSO the only way to sign in and turn off magic links?
No. Magic-link sign-in always keeps working alongside SSO, SAML, and SCIM. There is no require-SSO or disable-magic-link toggle, so you cannot enforce SSO as the sole authentication method. If your security policy demands a single mandatory login path, flag this limit before you commit.
Does Utter support Okta, Azure AD, and OneLogin?
Yes. Utter speaks standard OIDC and SAML 2.0, which Okta, Azure AD, and OneLogin all support, plus standard SCIM 2.0 for provisioning. You register Utter as an application (OIDC) or Service Provider (SAML) in your provider's console using the URLs Utter computes for you, and point your SCIM connector at the SCIM base URL with the Bearer token.
Where do I find the redirect URL, ACS URL, and SCIM base URL to register Utter with my IdP?
All of them are in Settings > SSO. The OIDC section shows the Redirect URL (/sso/{slug}/callback) and Sign-in URL. The SAML section shows the ACS (reply) URL and SP entity ID, and serves SP metadata XML at the metadata path. The SCIM section shows the SCIM base URL (/scim/v2). Copy each into the matching field in your identity provider.
What role do people get when they sign in through SSO for the first time?
Member. A first-time SSO user is just-in-time provisioned as a member of that one workspace. Utter does not map IdP groups to roles, so if someone needs to be an admin or owner, an existing owner or admin changes their role by hand inside Utter after they've joined.
Can SCIM sync groups and map them to Utter roles?
No. SCIM handles the User resource only. There is no SCIM Groups resource, no group sync, and no group-to-role mapping. Provisioned users always land as members, and roles are managed inside Utter.
The SCIM Bearer token only showed once and I lost it. What now?
Rotate it. The token is displayed exactly once at generation and stored only as a SHA-256 hash, so there is no way to view it again. Use Rotate token to mint a fresh one, update your identity provider's SCIM connector with the new value, and the old token stops working.
Related reading

How to create your first workspace
Getting started with a project management tool: sign in with a magic link (no password), create your first workspace and slug, and set a permanent project key.
July 15, 2026 · 15 min read
How to manage roles and permissions
Learn how project management roles and permissions work in Utter: the five roles, inviting with the right access, scoped projects, and who pays for a seat.
July 15, 2026 · 18 min read

What you can run in Utter without extra tools
A straight, capability-forward tour of the jobs Utter covers in its core, from a light help desk to integrations, estimation, and roadmaps, and when to pair a dedicated tool.
July 16, 2026 · 8 min read
How to use the rest api
Get an Utter API key and use the project management REST API to list, create, and update issues safely, with scopes, idempotency keys, and rate limits explained.
July 15, 2026 · 16 min read

How to invite team members
Invite team members to an Utter workspace and set their roles: the five roles explained, guest project scoping, invite lifecycle, ownership transfer, and billing.
July 15, 2026 · 16 min read
Utter integrations: the marketplace, OAuth apps, and the API-first model
Utter integrations explained: the 12-card marketplace, signed webhooks, scoped API keys, a first-party MCP server, and OAuth apps, plus what is missing and why.
July 16, 2026 · 13 min read
How to use webhooks
Set up outbound webhooks in Utter: create one, verify the HMAC signature (sha256-of-secret gotcha), handle at-most-once delivery, and pipe board events to Slack.
July 15, 2026 · 16 min read

How to use AI agents in Utter: connect them, assign work, and follow their sessions
A start-to-finish walkthrough: connect an agent, scope its key, assign it issues, and watch its sessions, without giving up control of the board.
July 15, 2026 · 11 min read
How to install utter as an agent skill
Install Utter as a skill in your AI coding agent: one-command MCP for Claude Code, config for Cursor and VS Code, or a SKILL.md download for OpenCode and Codex.
July 15, 2026 · 15 min read
Onboard an AI agent like a new hire: identity, access, and a first task
You already know how to bring on a new hire. Do the same for an AI agent: give it an identity, scoped access, one small task, a review, and an offboarding path.
July 15, 2026 · 8 min read
أضف تعليقًا
ابدأ النقاش.