
How to use webhooks
Your board changes and nothing outside Utter knows about it. Slack stays quiet. The analytics store goes stale. The on-call rotation never hears that WEB-142 flipped to In Review, so the deploy that was waiting on it just sits there until someone happens to look.
That gap is what project management webhooks close. When an issue moves, a comment lands, or a member joins, Utter can push a signed HTTP POST to a URL you control, the instant it happens, so the rest of your stack reacts in real time instead of on the next poll. This guide walks through Utter's in-product webhooks end to end: creating one, subscribing to the right events, verifying the signature correctly (there is one genuinely odd part), and writing a consumer that stays correct given how Utter actually delivers. At the end we wire board events straight into a Slack channel with no code at all.
One scoping note before we start. This is the Developer > Webhooks tab inside a workspace, the outbound push side. If you want the read side (fetching issues, comments, docs on demand), that lives in the REST API guide. Webhooks are the same resources, pushed to you instead of pulled by you.
Why project management webhooks beat polling the API
Here is the shape of the problem every integration eventually hits. Your board is the system of record for what work is in flight, and three or four other tools need to know when it changes. The obvious approach is to poll: hit the REST API on a timer, diff the result against what you saw last time, act on the difference. It works, sort of. But you learn about a change up to a minute late, most of your polls return nothing new, and you miss the exact moment the thing happened, which is often the only part you cared about.
Webhooks flip the direction. Instead of you asking "anything new?" on a schedule, Utter tells you the second something happens. Same resources as the REST API, same JSON shapes, delivered on the event rather than fetched on a clock.
Make it concrete. WEB-142, "Timeline + Summary tab," is sitting in the In Review column of your WEB project. A reviewer approves it and drags it to Done. With polling, your Slack channel and your deploy pipeline find out whenever the next poll runs, could be seconds, could be nearly a minute.
With a webhook, both get a signed POST within about a second of the drag landing, and the full issue is right there in the body. The pipeline can start; the channel gets its line of text. No timer, no diffing, no lag.
That is the whole case. Now let's build one.
Find the Webhooks tab (and why it's owner-only)
Everything lives under the Developer console. Go to /w/<workspace>/knowledge/developer and switch to the Webhooks tab, or jump straight there with ?tab=webhooks. API keys, skills, webhooks, and usage for the workspace all sit together in this one area.
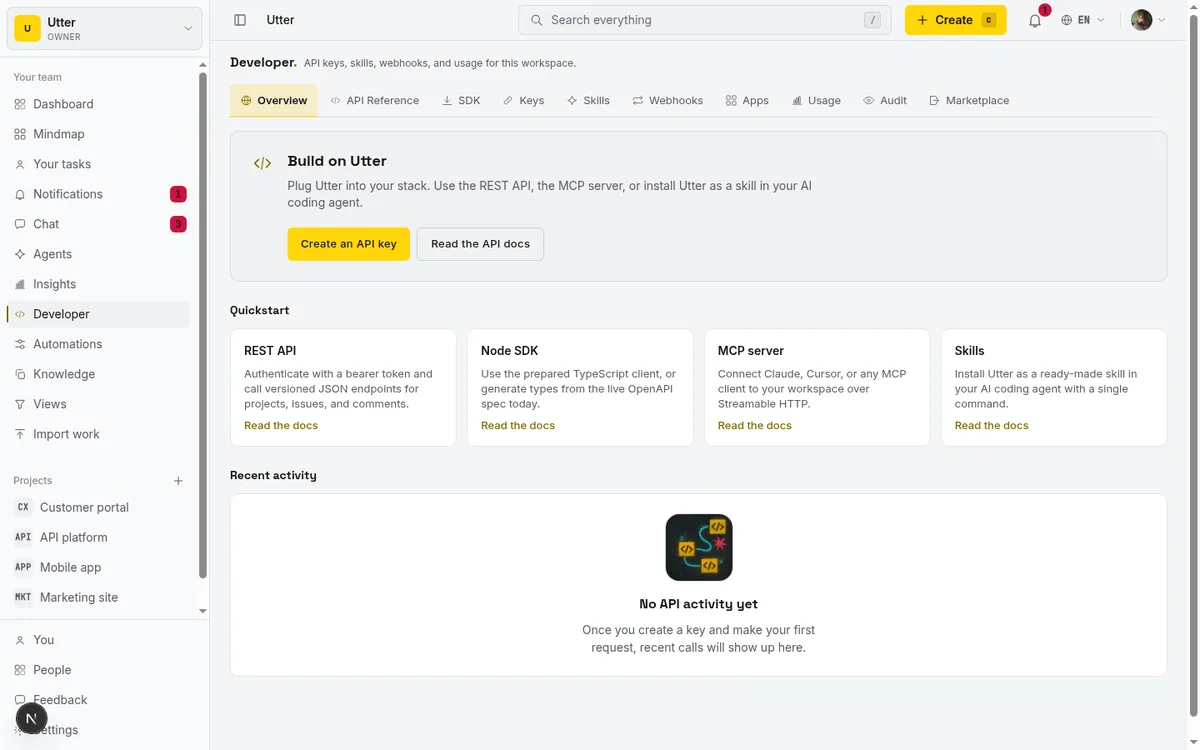
Before you get excited, a permissions check. The entire Developer panel gates on the workspace.edit_settings permission, which in practice means owners and admins. If you are a plain member or a viewer, you will not see any of this: the panel redirects you to the workspace home, and the Webhooks tab has its own owner-only state that reads "Webhooks are owner-only" with the line "Ask a workspace owner or admin to manage outbound webhooks." That is not a bug to route around. An outbound webhook carries a signing secret and can stream workspace activity to an external URL, so creating one is deliberately held to the people who own the workspace's settings.
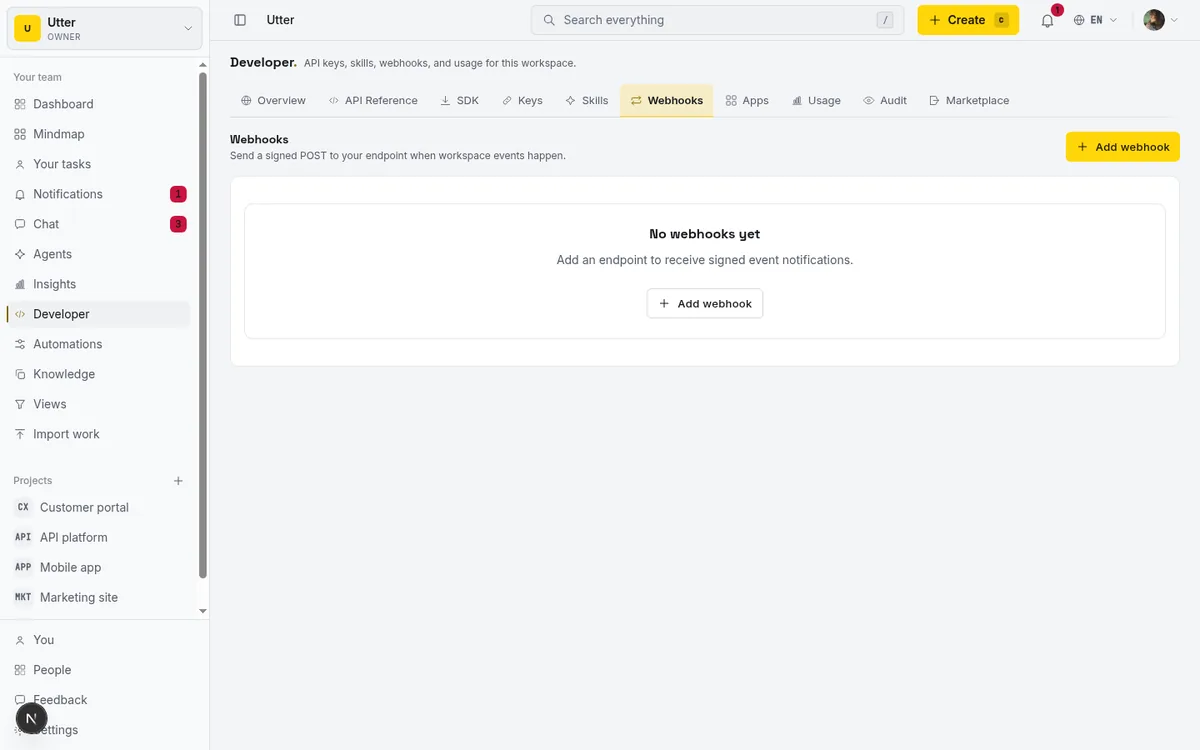
Assuming you have the role, the first time you land here you get the empty state: "No webhooks yet" with "Add an endpoint to receive signed event notifications." and an Add webhook button. That button is your entry point.
Once you have one or more webhooks, this same view is a table instead. Four columns: Endpoint (the URL you deliver to), Events (which types it is subscribed to), Status (an Enabled or Disabled badge), and Last delivery (the HTTP status code of the most recent attempt plus a relative time, or "Never" if nothing has fired yet). The table pages at 30 rows with a Load more button, so a workspace with a lot of integrations does not turn into an endless scroll.
Create a webhook and pick your events
Click Add webhook. The form is short, and it validates as you fill it.
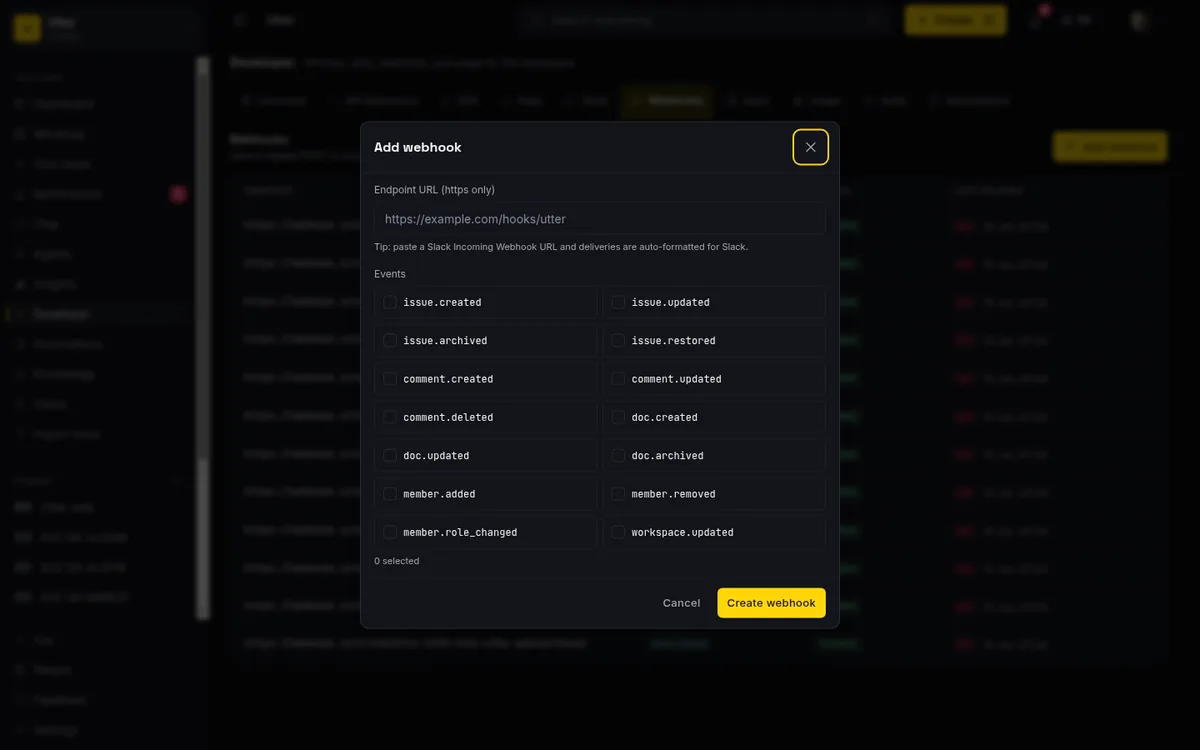
First, the Endpoint URL. The field is labelled "Endpoint URL (https only)" with a placeholder like https://example.com/hooks/utter. HTTPS is required: the form checks that the value is non-empty and starts with https://, and if you leave it blank or paste an http:// URL you get "Enter an endpoint URL" or "Endpoint must use https://" respectively. There is no way around the HTTPS rule, and there is a good reason for it that we get to below.
Then the events. You get a grid of 14 named checkboxes, one per event type:
- Issue events:
issue.created,issue.updated,issue.archived,issue.restored - Comment events:
comment.created,comment.updated,comment.deleted - Doc events:
doc.created,doc.updated,doc.archived - Member events:
member.added,member.removed,member.role_changed - Workspace events:
workspace.updated
As you tick boxes a "{n} selected" counter updates, and you need at least one or the form refuses with "Select at least one event." When you are set, hit Create webhook (it shows "Creating..." while it works).
If you would rather script it, the same thing is one call against the REST API, with an API key that has the webhooks:write scope:
curl -X POST "https://utter.ae/api/v1/workspaces/utter/webhooks" \
  -H "Authorization: Bearer utp_live_a1b2..." \
  -H "Content-Type: application/json" \
  -d '{
    "url": "https://example.com/hooks/utter",
    "event_types": ["issue.created", "issue.updated"]
  }'
const res = await fetch("https://utter.ae/api/v1/workspaces/utter/webhooks", {
method: "POST",
headers: {
Authorization: "Bearer utp_live_a1b2...",
"Content-Type": "application/json",
},
body: JSON.stringify({
url: "https://example.com/hooks/utter",
event_types: ["issue.created", "issue.updated"],
}),
});
const webhook = await res.json(); // 201; includes "secret" exactly onceimport requests
res = requests.post(
"https://utter.ae/api/v1/workspaces/utter/webhooks",
headers={"Authorization": "Bearer utp_live_a1b2..."},
json={
"url": "https://example.com/hooks/utter",
"event_types": ["issue.created", "issue.updated"],
},
)
webhook = res.json() # 201; includes "secret" exactly onceThe API path accepts one thing the form does not: "event_types": ["*"], the wildcard that subscribes to every event type. The create response is also the one and only place the API returns the plaintext secret, which matters in the next section.
My advice: subscribe narrowly. Checking everything is tempting, but every event you do not act on is just noise arriving at your endpoint, more to filter, more to log, one more shape your consumer can trip over. If all you want is board movement feeding Slack, issue.updated (plus maybe issue.created) is the entire story. Add more only when you have a concrete reason to.
Now the honest part. The issue.* and comment.* events are the reliably-wired live triggers today. They fire from the real write paths (issue create, update, archive, restore, status transition, and comment create, update, delete), whether the change came through the REST API, a bulk action, or someone clicking around the UI. The doc.*, member.*, and workspace.updated types are in the catalogue and you can subscribe to them, but before you build anything that depends on one of them firing, make a real change and confirm the delivery actually lands. Treat the issue and comment events as load-bearing and the rest as verify-first.
You might also spot an "all events" badge somewhere. That is the API wildcard above surfacing in the UI, not a checkbox on this form. The create modal only offers the 14 named types, so do not go hunting for an "All events" tickbox. It is not here.
Copy the signing secret (you only get it once)
The moment you click Create webhook, Utter shows a "Webhook created" reveal step, and this is the one screen you cannot skim.
It shows the signing secret: a token prefixed with whsec_, with a Copy button beside it. This secret is how you prove that an incoming delivery genuinely came from Utter and was not forged by someone who guessed your endpoint URL. You get it exactly once. After this screen, Utter only ever shows you an 8-character "Secret prefix" for identification. The full secret is stored as a hash on their side and can never be displayed again.
To stop you flying past it, there is a mandatory checkbox: "I have copied the signing secret and stored it safely." The Done button stays disabled until you tick it. That friction is on purpose.
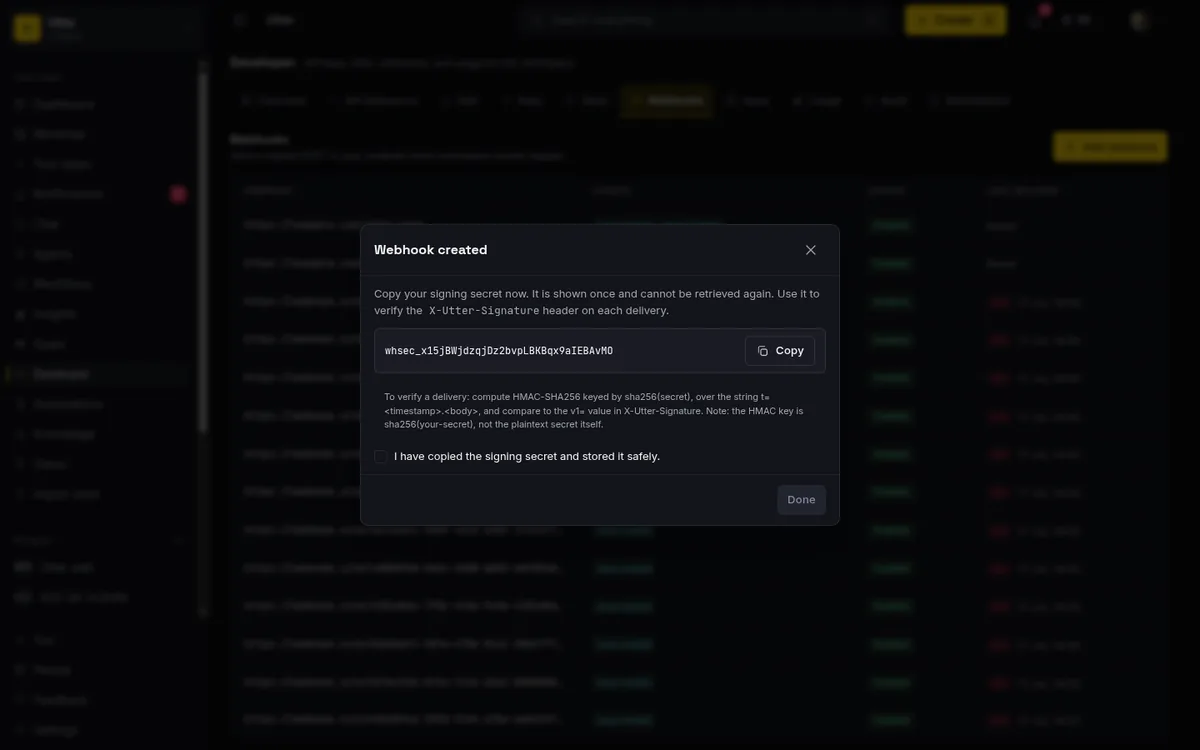
So do the safe thing right now, before Done. Copy the secret and put it where your consumer reads it: a secrets manager, or at a minimum an environment variable on the service that receives the webhook. Do not paste it into a chat, a ticket, or a code comment. If you lose it there is no recovery path. You rotate the secret and update your consumer with the new one (covered later). Storing it properly here saves you that whole round trip.
What a signed delivery actually looks like
Once the webhook is live, every subscribed event becomes an HTTP POST to your endpoint. Knowing the exact shape of that request makes the consumer easy to write.
sequenceDiagram
    participant B as Board
    participant U as Utter
    participant C as Your endpoint
    B->>U: WEB-142 moves to Done
    U->>C: POST signed envelope
    C->>C: Verify signature
    C-->>U: 2xx within 15s
    Note over U,C: One attempt, no retry
On the wire, a delivery looks like this:
POST /hooks/utter HTTP/1.1
Host: example.com
Content-Type: application/json
User-Agent: Utter-Webhook/1.0
X-Utter-Event: issue.updated
X-Utter-Delivery: 0197f3a0-6c2e-7b31-a3d2-8f4e5b6c7d8e
X-Utter-Signature: t=1752573120, v1=5f8a3c...
What each header means:
X-Utter-Signatureformatted ast=<unix>, v1=<hex>(note the space after the comma).tis the Unix timestamp when Utter signed the request;v1is the HMAC hex digest you verify against.X-Utter-Eventis the event type, for exampleissue.updated.X-Utter-Deliveryis a UUID that uniquely identifies this delivery.User-AgentisUtter-Webhook/1.0.
The body is a JSON envelope with a stable shape:
{
  "id": "<delivery-uuid>",
  "event": "issue.updated",
  "workspace": "<workspace-slug>",
  "created_at": "2026-07-15T10:32:00Z",
  "data": { "...the full resource..." }
}
Two details worth burning into memory. First, id equals the X-Utter-Delivery header value, which hands you a natural idempotency key (hold that thought, it matters below). Second, and this is the one that saves real work: data is the full REST resource for the affected entity, the same object you would get from a REST GET on that resource. When WEB-142 moves to Done, the data object is the complete issue: key, title, status, assignee, all of it. You do not need a second API call to go fetch the details. The webhook already carried them. If you know the REST API's issue shape, you already know this payload.
A few delivery constraints to design around: Utter waits up to 15 seconds for your endpoint to respond, treats any 2xx status as success, and captures your response body up to a 4 KB cap for the delivery log. So respond fast, respond 2xx, and push the heavy processing to after you have acknowledged, not before.
Verify the signature (the sha256-of-secret gotcha)
Read this section twice. Getting it wrong means every delivery fails your check silently, and you will swear the webhook is broken when it is your verifier that is off by one step.
The recipe. To verify a delivery:
- Read the
X-Utter-Signatureheader and split it intot(the timestamp) andv1(the hex signature). - Take the raw request body, exactly as bytes, before any JSON parse and re-serialize. Reordering keys or reformatting whitespace changes the signature and breaks the check.
- Build the signed string as
<t>.<rawBody>: the timestamp, a literal dot, then the raw body. - Compute
HMAC-SHA256over that string, usingsha256(secret)as the key. That is the hex SHA-256 hash of your signing secret, not the plaintext secret. - Constant-time compare your computed hex digest against the
v1value from the header.
Step 4 is the gotcha, and it is genuinely unusual. Most webhook systems HMAC with the raw secret. Utter keys the HMAC with the SHA-256 hash of the secret. Feed the plaintext whsec_... string in as the key and your digest never matches, and you get zero valid deliveries with no error telling you why. Hash the secret first, use the hex hash string as the key.
In Node, the whole verifier is a few lines:
import { createHash, createHmac, timingSafeEqual } from "node:crypto";

function verifyUtterSignature(rawBody, signatureHeader, secret) {
  const t = signatureHeader.match(/t=(\d+)/)?.[1];
  const v1 = signatureHeader.match(/v1=([0-9a-f]+)/)?.[1];
  if (!t || !v1) return false;

  const key = createHash("sha256").update(secret).digest("hex"); // the gotcha
  const expected = createHmac("sha256", key)
    .update(`${t}.${rawBody}`)
    .digest("hex");

  const a = Buffer.from(expected);
  const b = Buffer.from(v1);
  return a.length === b.length && timingSafeEqual(a, b);
}
import hashlib
import hmac
def verify_utter_signature(raw_body: bytes, signature_header: str, secret: str) -> bool:
parts = dict(p.strip().split("=", 1) for p in signature_header.split(","))
t, v1 = parts.get("t"), parts.get("v1")
if not t or not v1:
return False
key = hashlib.sha256(secret.encode()).hexdigest() # the gotcha
signed = f"{t}.".encode() + raw_body
expected = hmac.new(key.encode(), signed, hashlib.sha256).hexdigest()
return hmac.compare_digest(expected, v1)Two more safety notes. Both snippets end with a constant-time comparison, not ==, so you do not leak timing information; keep that in whatever language you port this to. And consider rejecting deliveries whose t is more than a few minutes old. The timestamp sits inside the signed string precisely so you can defend against replay. Get this function right once, test it (next section), and you never think about it again.
Test your endpoint before you trust it
You do not have to move a real ticket to check your consumer. Utter ships a built-in test delivery.
Click a webhook's row in the table to open its details drawer. Inside you see the endpoint URL with an Enabled badge, the event badges for what it is subscribed to, the Secret prefix (those 8 characters, for identification), and an action row: Send test, Rotate secret, Delete.
Send test POSTs a synthetic webhook.test event straight to your endpoint and reports the HTTP status your server returned in a toast, like "Test sent (200)." That one click confirms the whole chain: your endpoint is reachable, your signature verifier accepts a real Utter-signed request, and you are returning a 2xx. If the toast shows a non-2xx or an error, you caught the problem before any real event depended on it.
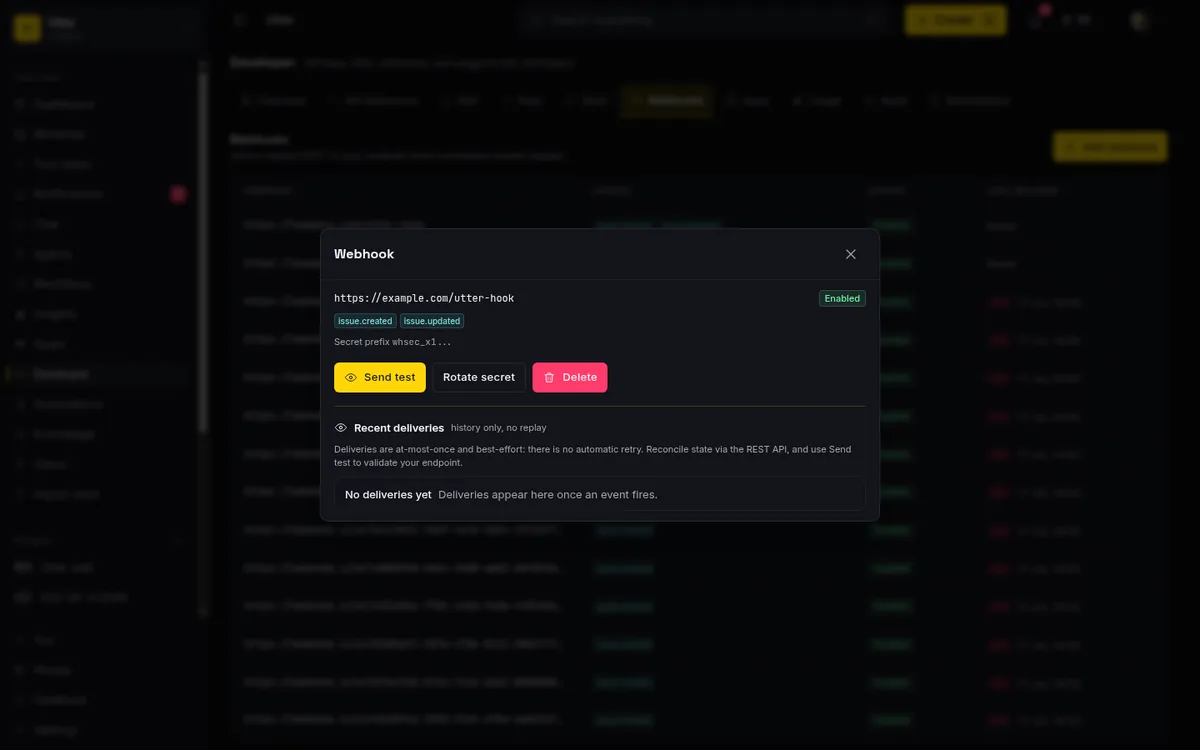
The same trigger exists on the API, handy in a deploy script:
curl -X POST "https://utter.ae/api/v1/workspaces/utter/webhooks/<webhook-id>/test" \
  -H "Authorization: Bearer utp_live_a1b2..."
One constraint: you cannot test a disabled webhook. If it is switched off, the button is disabled and you see "Enable the webhook before sending a test." Enable it first, then test.
Make this a habit. Every time you touch the verifier or redeploy the consumer, hit Send test and watch for the 200. It is the cheapest confidence you will buy all day.
The honest limits: no retry, no replay, reconcile via REST
This is the most important section in the guide, because it is where a naive consumer quietly loses data.
Utter's delivery is deliberately at-most-once and best-effort. The product's own note in the drawer says it flat out: "Deliveries are at-most-once and best-effort: there is no automatic retry. Reconcile state via the REST API, and use Send test to validate your endpoint." Read that literally. If a delivery POST fails, because your endpoint is down, or times out past the 15 seconds, or returns a 500, Utter logs the failure and drops it. It is never retried. No exponential backoff, no dead-letter queue you can drain later.
flowchart LR
    A[Event fires] --> B[One POST attempt]
    B -->|2xx| C[Logged as success]
    B -->|error or timeout| D[Logged and dropped]
    D --> E[Reconcile via REST]
Which means a delivery can be lost, and you have to build for that. Two rules follow.
First, make your consumer idempotent, keyed on the delivery id (the X-Utter-Delivery UUID, also the id in the envelope). Because you will sometimes reprocess, dedupe on that id so acting twice does no harm.
Second, and this is the bigger one, treat webhooks as a fast notification layer, not the source of truth. Reconcile against the REST API periodically, because the REST API is authoritative. If your Slack channel or analytics store must never miss a status change, do not assume every event arrived: poll the REST API on a slow cadence (every few minutes, not every few seconds) to sweep up anything the push layer dropped. Webhooks make you fast. REST reconciliation makes you correct. You want both. It is exactly the pattern you would build if you were letting an AI agent run your board over the REST API: react to the push, verify against the pull.
The drawer also shows a "Recent deliveries" table, and it helps to know what it is and is not. It is read-only history, labelled "history only, no replay," pulled from ClickHouse: up to the 50 most recent attempts. Each row shows:
| Column | Meaning |
|---|---|
| Event | The event type delivered, e.g. issue.updated |
| Status | The HTTP response code, or ERR if the request itself failed |
| Attempt | Always 1; there is only ever one attempt per delivery |
| Latency | Round-trip time in milliseconds |
| When | Relative timestamp of the attempt |
Genuinely useful for debugging ("did my endpoint 500 at 10:32?"). But note what is missing. The request bodies are not stored, so there is no resend or replay button anywhere. And do not read the Attempt column as a retry counter. It is not one. Before any events have fired you see "No deliveries yet" with "Deliveries appear here once an event fires."
So the mental model is simple: Utter tries once, tells you what happened, and moves on. Your consumer's job is to be reliable on its end and reconcile the rest from REST.
Rotate secrets, and the HTTPS/SSRF rules
Two operational things you will eventually need: rotating the secret, and understanding why "just test against localhost" will not work.
Rotating the secret. In the drawer, Rotate secret mints a fresh whsec_ secret and shows it once, inline, under "New signing secret, shown once:" (with a "Secret rotated" confirmation). Copy it immediately, same discipline as creation: once, then only the prefix.
The overlap behavior is easy to describe wrong, so here it is precisely. After rotation, the previous secret's hash stays valid for verification for a 24-hour window, but that window exists only on the consumer's side, to give your verifier time to catch up. Utter always signs new deliveries with the current (new) secret. It is not a period where old-secret-signed deliveries keep arriving. In practice: rotate, deploy your consumer with the new secret, and during the transition accept a signature that matches either the old or the new key. Once you have cut over, drop the old one.
The network rules. Endpoints have to be public HTTPS. An SSRF guard rejects, at both create time and delivery time:
localhostand*.localhost- single-label hostnames
- URLs with
user:pass@userinfo - private or reserved IP ranges
Delivery also will not follow 3xx redirects. This is standard defense against tricking a server into calling internal addresses, and it is not configurable.
The practical consequence: you cannot point a webhook at http://localhost:3000 to test locally. To develop against your own machine, run a public HTTPS tunnel (ngrok, Cloudflare Tunnel, whatever you like) and give Utter the tunnel's HTTPS URL. Then Send test reaches your local server through the tunnel exactly like a real delivery would.
Deleting. Delete is behind a confirm dialog: "Delete this webhook?" with "Deliveries to this endpoint will stop immediately. This cannot be undone." Deletion is immediate and scoped to your workspace. When you retire an integration, delete its webhook so you are not signing and shipping events into a void.
Send Utter events straight to Slack
Here is the payoff that needs almost no code.
Create a Slack Incoming Webhook in your Slack workspace (Slack hands you a URL on hooks.slack.com). Then create an Utter webhook pointing at that Slack URL, subscribe it to the events you want in the channel (issue.updated is the obvious one for board movement), and you are done. Utter detects a hooks.slack.com target and auto-formats each delivery into a Slack { text, blocks } message (the text is the plain fallback line, and blocks carries the same line as a mrkdwn section). No transform layer, no glue service, no parsing on your side.
So when WEB-142 flips to Done, what lands in Slack is not the raw envelope but a ready-made message:
{
  "text": "Updated issue *WEB-142*: Timeline + Summary tab (done) - utter",
  "blocks": [
    { "type": "section", "text": { "type": "mrkdwn", "text": "Updated issue *WEB-142*: Timeline + Summary tab (done) - utter" } }
  ]
}
A line appears in your team channel on its own. You saw the hint for this back on the create form: "Tip: paste a Slack Incoming Webhook URL and deliveries are auto-formatted for Slack." That tip is the whole integration.
One consequence to internalize: because Slack has nothing to verify against, Utter does not send an X-Utter-Signature header to Slack targets. The body is a Slack message, not the raw signed envelope. So do not write signature-verification code for a Slack endpoint. There is no signature to check, and Slack would not know what to do with one. Signature verification is for your own consumers receiving the raw envelope. Slack is the special case that skips it.
This is the fastest webhook to stand up and the one most teams reach for first. Point it at a channel, Send test to confirm the message lands, and your board is talking to Slack.
If you are wiring agents rather than channels into this stream, the same signed envelope is what an automated consumer reads, and it pairs naturally with the read and write patterns in how to connect an AI agent and the MCP vs REST comparison when you are deciding how that agent talks back to Utter.
Set one webhook up today, point it at the tool that is currently last to know, and hit Send test to watch it land.
Frequently asked questions
Where do I find webhooks in Utter, and who can create them?
Go to /w/<workspace>/knowledge/developer and switch to the Webhooks tab (?tab=webhooks). The whole Developer area is owner and admin only, gated on the workspace.edit_settings permission. Members and viewers are redirected away and see a "Webhooks are owner-only" message, so you need a workspace owner or admin to manage them.
How do I verify an Utter webhook signature, and why does it use the SHA-256 hash of the secret instead of the secret itself?
Recompute HMAC-SHA256 over the string <t>.<rawBody>, where t is the timestamp from the X-Utter-Signature header and rawBody is the unparsed request body, then constant-time compare your hex digest against the v1= value in that header. The HMAC key is sha256(secret), the SHA-256 hash of your signing secret, not the plaintext. That is the detail people miss: key the HMAC with the raw whsec_ string and it will never match. Hash the secret first.
Does Utter retry failed webhook deliveries?
No. Delivery is at-most-once and best-effort. A failed POST is logged and dropped, never retried, with no backoff and no queue. Build an idempotent consumer and reconcile authoritative state against the REST API so a lost delivery does not cost you data.
Can I replay or resend a past webhook delivery?
No. The Recent deliveries table is read-only history (Event, Status, Attempt, Latency, When) for up to the 50 most recent attempts, and request bodies are not stored, so there is no replay or resend button. The only way to trigger a delivery on demand is Send test, which POSTs a synthetic webhook.test event.
What event types can a webhook subscribe to in Utter?
The create form lists 14 named checkboxes: issue.created, issue.updated, issue.archived, issue.restored, comment.created, comment.updated, comment.deleted, doc.created, doc.updated, doc.archived, member.added, member.removed, member.role_changed, and workspace.updated. The issue.* and comment.* events are the reliably-wired live triggers; confirm the doc, member, and workspace types fire in your setup before depending on them. The "all events" wildcard is an API and data-model concept shown as a badge, not a checkbox on the form.
Do I need a second API call to get the full data after receiving a webhook?
No. The envelope's data field is the full REST resource for the affected entity, identical to what a REST GET would return. When an issue moves, the complete issue is already in the payload, so there is no callback fetch needed.
How do I send Utter board events to a Slack channel?
Create a Slack Incoming Webhook (a hooks.slack.com URL), then create an Utter webhook pointing at it and subscribe to the events you want. Utter auto-formats deliveries to Slack targets into a { text, blocks } message with no extra config. Slack targets do not receive an X-Utter-Signature, so you do not write signature verification for them.
Why can't I test my webhook against http://localhost?
Two reasons. Endpoints must be HTTPS (the form rejects anything that is not https://), and an SSRF guard rejects localhost, single-label hosts, userinfo in the URL, and private or reserved IPs at both create and delivery time, with no 3xx redirects followed. To develop locally, run a public HTTPS tunnel and give Utter the tunnel's URL.
Related reading
How to use the rest api
Get an Utter API key and use the project management REST API to list, create, and update issues safely, with scopes, idempotency keys, and rate limits explained.
July 15, 2026 · 16 min read
How to use team chat
A practical guide to team chat in a project management tool: channels, DMs, threads, @mentions, file attachments, and the honest limits, all next to your issues.
July 15, 2026 · 16 min read
How to manage roles and permissions
Learn how project management roles and permissions work in Utter: the five roles, inviting with the right access, scoped projects, and who pays for a seat.
July 15, 2026 · 18 min read
How to track api usage and audit logs
Track API key usage and read the audit log in Utter: Usage tab charts, the Audit lifecycle log, per-key rate limits, and what each surface will not tell you.
July 15, 2026 · 15 min read

How to create your first workspace
Getting started with a project management tool: sign in with a magic link (no password), create your first workspace and slug, and set a permanent project key.
July 15, 2026 · 15 min read
How to connect github
Connect GitHub to your project management tool in Utter: register a repo, set the webhook, and auto-link commits to issues with #KEY-NUM. Full rules and limits.
July 15, 2026 · 15 min read
How to invite team members
Invite team members to an Utter workspace and set their roles: the five roles explained, guest project scoping, invite lifecycle, ownership transfer, and billing.
July 15, 2026 · 16 min read
What you can run in Utter without extra tools
A straight, capability-forward tour of the jobs Utter covers in its core, from a light help desk to integrations, estimation, and roadmaps, and when to pair a dedicated tool.
July 16, 2026 · 8 min read
Utter integrations: the marketplace, OAuth apps, and the API-first model
Utter integrations explained: the 12-card marketplace, signed webhooks, scoped API keys, a first-party MCP server, and OAuth apps, plus what is missing and why.
July 16, 2026 · 13 min read
Notifications and watching issues
Set up Utter notifications and watch issues: the four events that notify you, who gets pinged, inbox triage, snooze and archive, and email vs in-app.
July 15, 2026 · 16 min read
أضف تعليقًا
ابدأ النقاش.